Introduction
I’ve always been interested in TV technology and have spent 20 years as a Broadcast Engineer, supporting TV and radio studios. I’ve always liked the look of a particular, very distinctive looking hand held microphone, used frequently on TV in Britain the 80’s and 90’s and early 2000’s – the Micron TX503 and its identical looking predecessor, the Micron TX203.
I finally managed to pick one up from TV equipment auction site techbid.co.uk for the bargain price of £35 (including buyer’s premium and VAT). When I went along to collect the mic, I found the receiver had not sold, so I picked that up for another £35. At a later auction, the matching pocket transmitters (TX501) were picked up for a further £35. So I have pretty much a complete radio mic set up from a TV studio:
- Receiver rack with 8 receiver modules – MDR540.1
- Handheld TX503 microphone
- 5x Pocket transmitters, TX501
History
Micron was a brand used for radio microphone equipment manufactured by Audio Engineering LTD, based in London. The firm was spun out of a professional audio hire company called Bettersound in 1965. Bettersound still exists and are the “go to” supplier if you’re making a TV show and need to hire mics and other audio equipment. Audio Engineering, however, is no longer in business.
The first show I can remember featuring a handheld Micron was the original UK version of The Price is Right with Leslie Crowther. This show was produced by Central TV (now ITV) and ran from 1984-1988.

This mic was in fact the Micron TX203. This looked identical from the outside, the TX503 having many refinements on the inside.
Other notable shows from my youth include The Word (Channel 4) where it was used for interviews and bits and bobs in amongst the (rowdy) audience, and famously by Oliver Reed and his drunken rendition of “Wild Thing”.

I once went to be in the audience for this show in the 90’s. It was brilliant. I got told off by Pinky the “audience co-ordinator” for standing with my hands in my pockets. But that’s a story for another day…
I consider this mic to be a design classic – up there with the Technics 1210 and original iMac. It is instantly recognisable and has a unique design – angular lines (rather than round like most other mics), a stainless steel finish and flat mesh covering the mic transducer. And it has fantastic retro appeal.
I’m not the only one to think so – the production designer on the first Mamma Mia! film liked the look of them so much that three Microns appear in the closing credits sequence.

Clean up and restoration
The TX503 was in pretty good shape. I started with a general clean up, using alcohol in the nooks and crannies and Brasso on the stainless steel body.
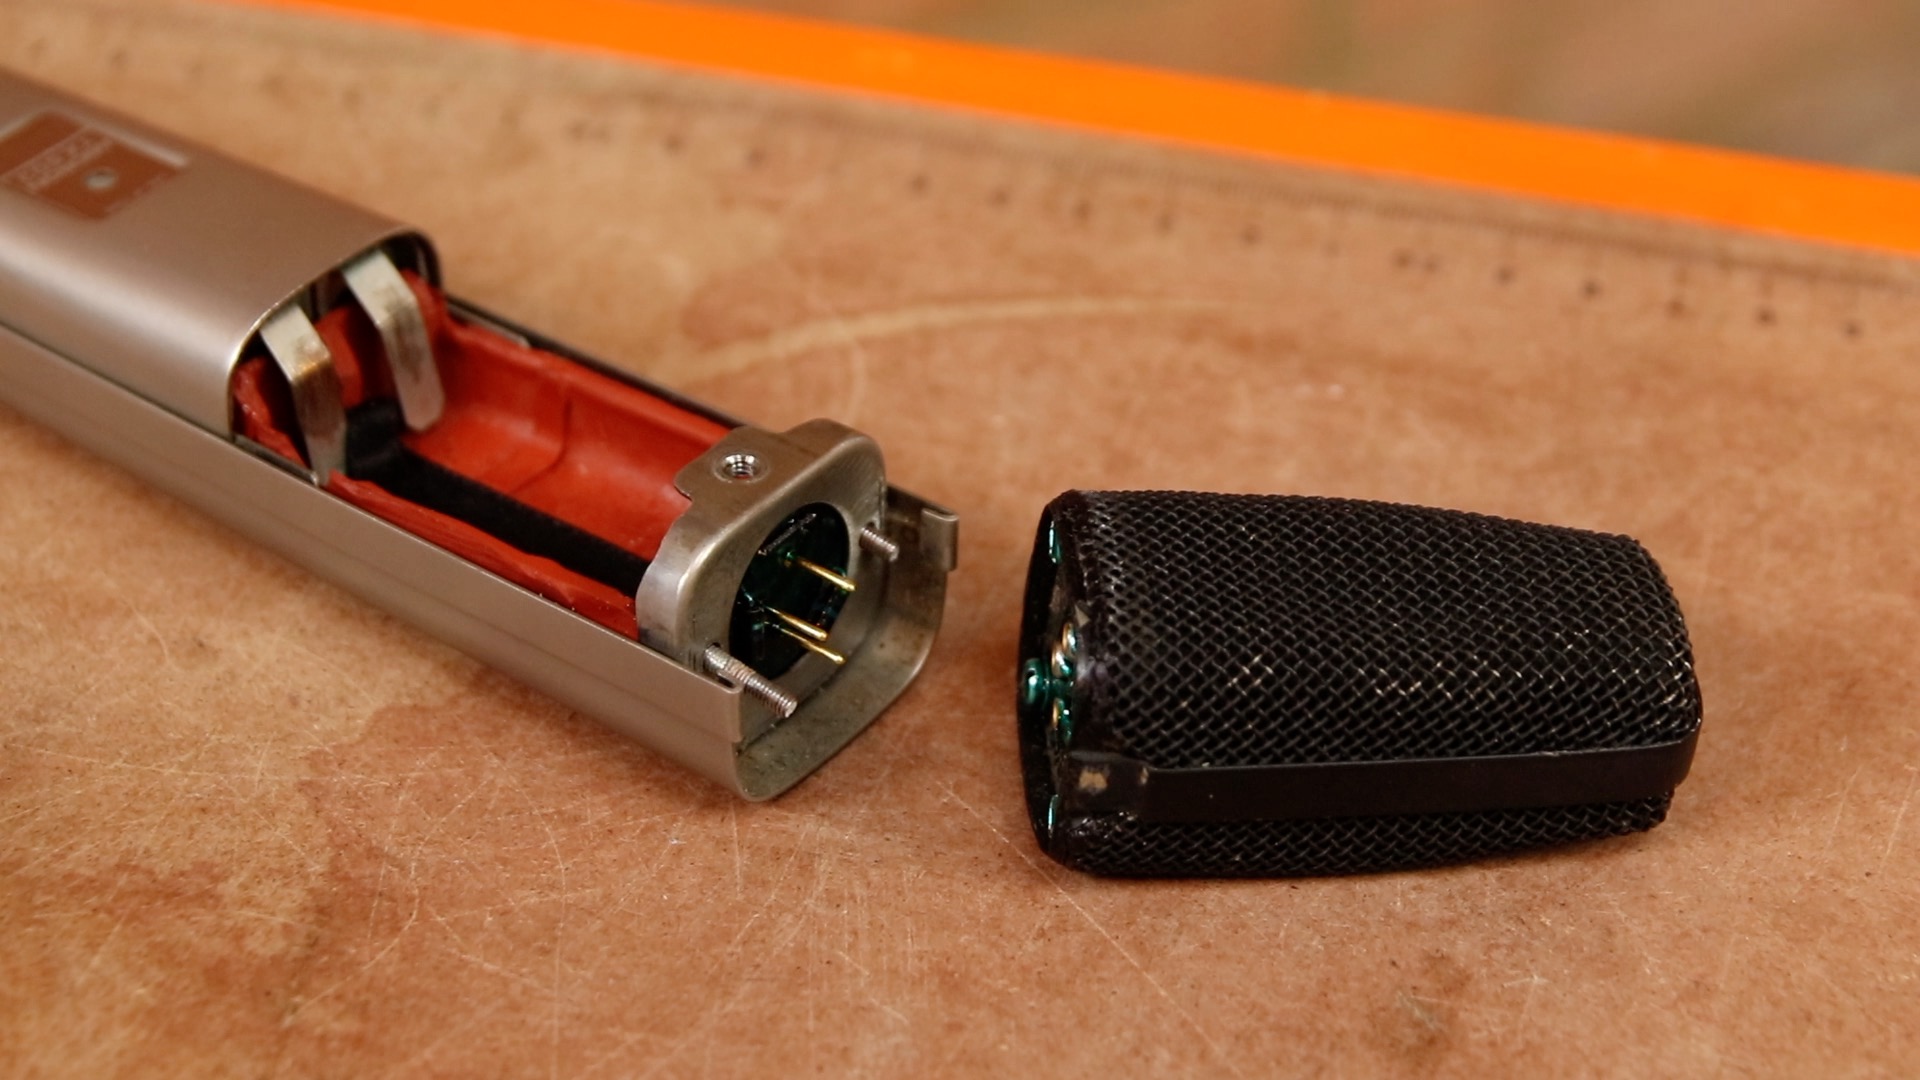
The black paint on the mesh was a little chipped, so I removed the capsule which is held in place by two long hex screws. I cleaned the mesh with a stiff brush and alcohol, then gave it a quick spray with matt black paint. This wont affect the audio as it is such a thin layer of paint.
The antenna is a helical coil of wire covered in sleaving, which was split. I covered this with some heat shrink tubing and this was a good match.
The receiver rack needed a good clean up. There was some brown glue on the top panel. I tried cleaning this off with solvents including nail varnish remover (which contains acetone). However, after much scrubbing, I was starting to affect the surrounding paint so I stopped. However, I noticed a few days later that the glue had gone brittle, and was able to carefully scrape it off.
There were numerous sticky labels on the unit (the sound department love labelling things with white paper labels or Post-It tape). There was also some sticky residue from gaffer tape. This was soon shifted with some white spirit.
The receiver rack comprises a number of modules screwed into a standard Eurorack enclosure. The eight mic receivers are at the front – and one of these had a broken plastic handle. I found a similar Schroff part on Digikey so ordered a few up. However, once fitted, these were too shallow and at the wrong angle. Nothing that couldn’t be solved by hacking a few bits together with a hacksaw and a bit of fine tuning with the Dremmel.
The engraved plate with the channel number was also missing. I got a similar plate engraved at a local cobblers, and it isn’t a bad match. I’d prefer the original silver metal plate (the cobbler used his own silver coloured plastic rather than the metal plate supplied with the replacement handle) – and I will keep an eye out for a firm that can do a perfect match.
Operational Tour – TX503 handheld microphone
The mic is powered by a PP3 battery which is housed in a compartment acessible by undoing a single screw. The compartment is rubber lined to stop the battery wobbling around, and this hasn’t degraded. There is a small switch offering 3 levels of bass cut, and access to the hex screws to remove the microphone capsule.
This mic is fitted with a omni-directional condenser capsule, which I believe was made by AKG (I’m not 100% on this, only one internet source was found to back this up). There was also a cardiod capsule available, and the colour of the mesh (early models) or colour of the metal band over the mesh (later models) indicates the polar pattern. If you remove the capsule, the type is written on the bottom in ink. The omni picks up sound from all around (good for most TV work e.g. interviews). The cardiod capsule has a more directional pickup pattern, and is preferred for singing.
On the bottom of the mic is a 3 position power switch: Off / Muted / On. There is also a switch that selects the sensitivity:
- Loud gives a -10dB cut, and is to be used in loud environments
- Normal gives zero gain
- Quiet adds a +10dB boost
On the body of the mic there is a small button to send tone. This is to aid “line-up” with the sound mixer – to set level and identify a particular mic.
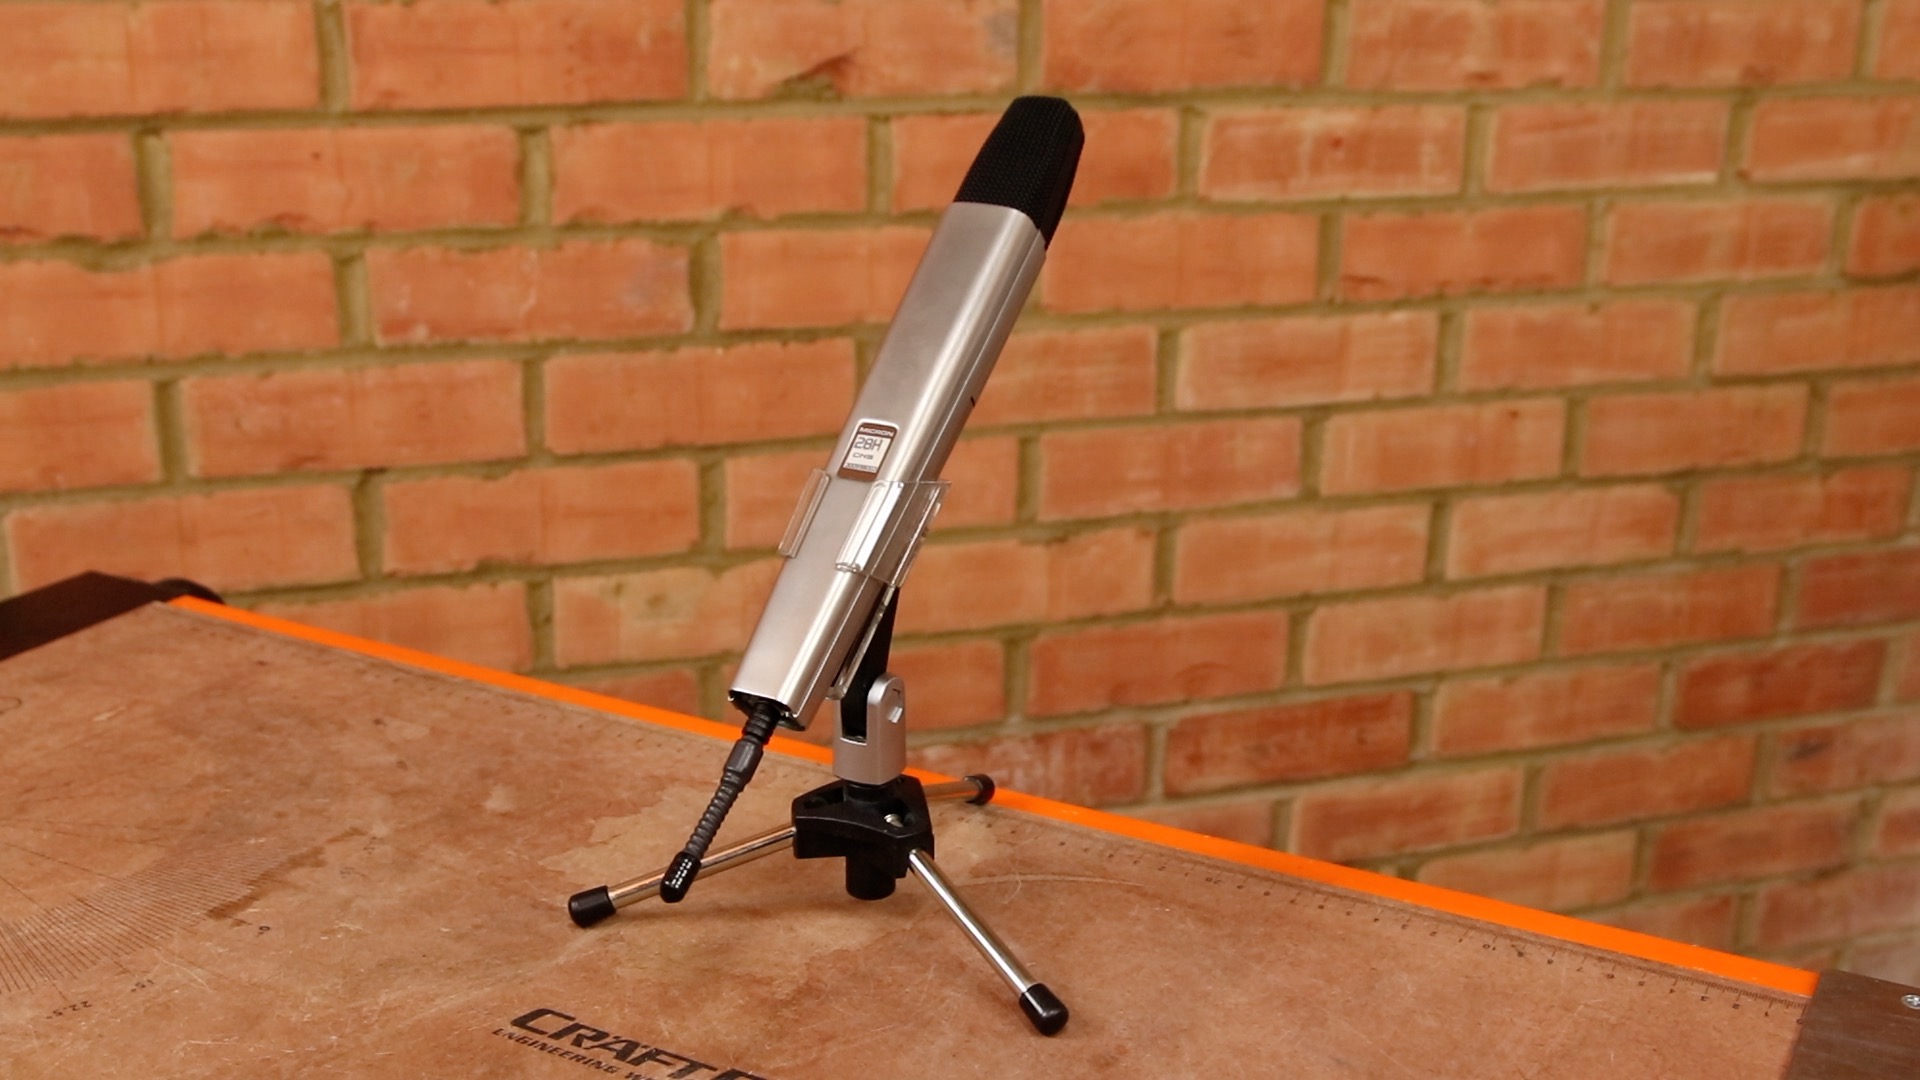
There is a small Lemo coaxial connector for the antenna. Older TX203’s had a screw-on antenna. This is a helical type antenna, and different lengths were available to suit the required frequency.
There is a label with the frequency on one side (533.85MHz) , and the frequency listed on other side by TV channel – this one is labelled as 28H.
UK Radiomic frequencies
Radio mics are available in two frequency bands – UHF or VHF.
The UHF band used by radio mics is also used for TV broadcasts. It extends from 470 to 862 MHz. For convenience these frequencies are known as channels 21 to 69. They represent an 8 MHz channel that was used for a single analogue TV station (BBC1, BBC2, ITV etc.). Since digital switch over, an 8 MHz channel now contains a single digital TV multiplex (a block of data that can be used for any number of TV or radio stations). If the channel is not in use for TV, it may be used for radio microphones. You can fit a number of radio mics in the space occupied by a single TV channel.

This Micron has a 200 KHz channel spacing. This would suggest you could fit 40 such mics into the space occupied by an 8 MHz TV channel. However, due to intermodulation effects, some frequencies will interfere with one another. So in practise you can fit far fewer. Micron have specified 8 frequencies that don’t interfere with one another in channel 28. They have labelled these A to H. My TX503 is on channel 28H.
Radio Mic Licensing
Channel 38 is set aside for radio mic use in the UHF band throughout the UK. With a single license bought for £75, you can use radio mics in this channel at any location. It is called a “shared license“. This means you don’t get exclusive rights to use this channel, and you may get contention with other users. However, radio mics are low powered devices, so unless you are within the same building you are unlikely to have any problems with interference.
Channel 70 is a 2MHz channel reserved for radio mics, and does not require a license.
If you use any other channels you will need a “co-ordinated license“. For this you have to specify a location and date. This is more expensive, but does mean you get sole use of a frequency. This type of license is used by theatres and TV studios for their on-site radio mics. Also for outside broadcasts and events such as Wimbledon and Glastonbury.
There are also some channels in the VHF band that are free to use without a license, and others that require a separate “shared license“.
For more information and to buy a license, visit the OFCOM website:
https://www.ofcom.org.uk/manage-your-licence/radiocommunication-licences/pmse
It is worth noting that there is a large fine if you get caught without a license. Of course, you’re only likely to get caught if you are causing a nuisance and another user complains.
Be aware that there are many 2nd hand radio mics on eBay that operate in channel 69. Channels 61 to 69 have for a number of years been re-allocated for mobile phone use, so you will get likely find these radio mics are un-usable. Channel 69 was the old “shared” frequency (now channel 38). In fact (as March 2019), I’ve since learned that the 700Mhz band (channels 50 to 60) are also due to be sold off, and OFCOM offer a “buy back” scheme for mics in this range. These frequencies will also be used for phones (5G) and must be avoided.
You can buy a selection of radio mics on Amazon in the 500-600MHz band. These appear to be manufactured for the US market. They are likely to be bought by those unaware of UK radio mic license requirements.
FM transmission
The TX500 series (later “MK 4” like mine) uses the following parameters:
- narrowband FM transmission (+/- 15kHz deviation)
- 30mW power
- 200 kHz channel spacing
- 50uS time constant (HF boost, same as used in FM radio broadcasts)
Companding
Audio signals (especially microphones) have a wide dynamic range. That’s to say there is a large difference between the loudest and quietest sounds.
Radio channels, on the other hand, have by their nature a narrow dynamic range.
Therefore using a radio channel to transmit an analogue audio signal can cause the dynamic range to suffer.
To get around this limitation, professional radio mics use a compander. The mic signal is first compressed in its dynamic range in the transmitter. The compressed signal is carried over the radio link. The receiver then expands the dynamic range of the signal. This has the added bonus of reducing noise in the system.
You can think of the compandor as mapping input voltages to output voltages of a more limited range. A bit like a look up table. The receiver then expands the signal out using a different look up table, by mapping input voltages to the output voltages.
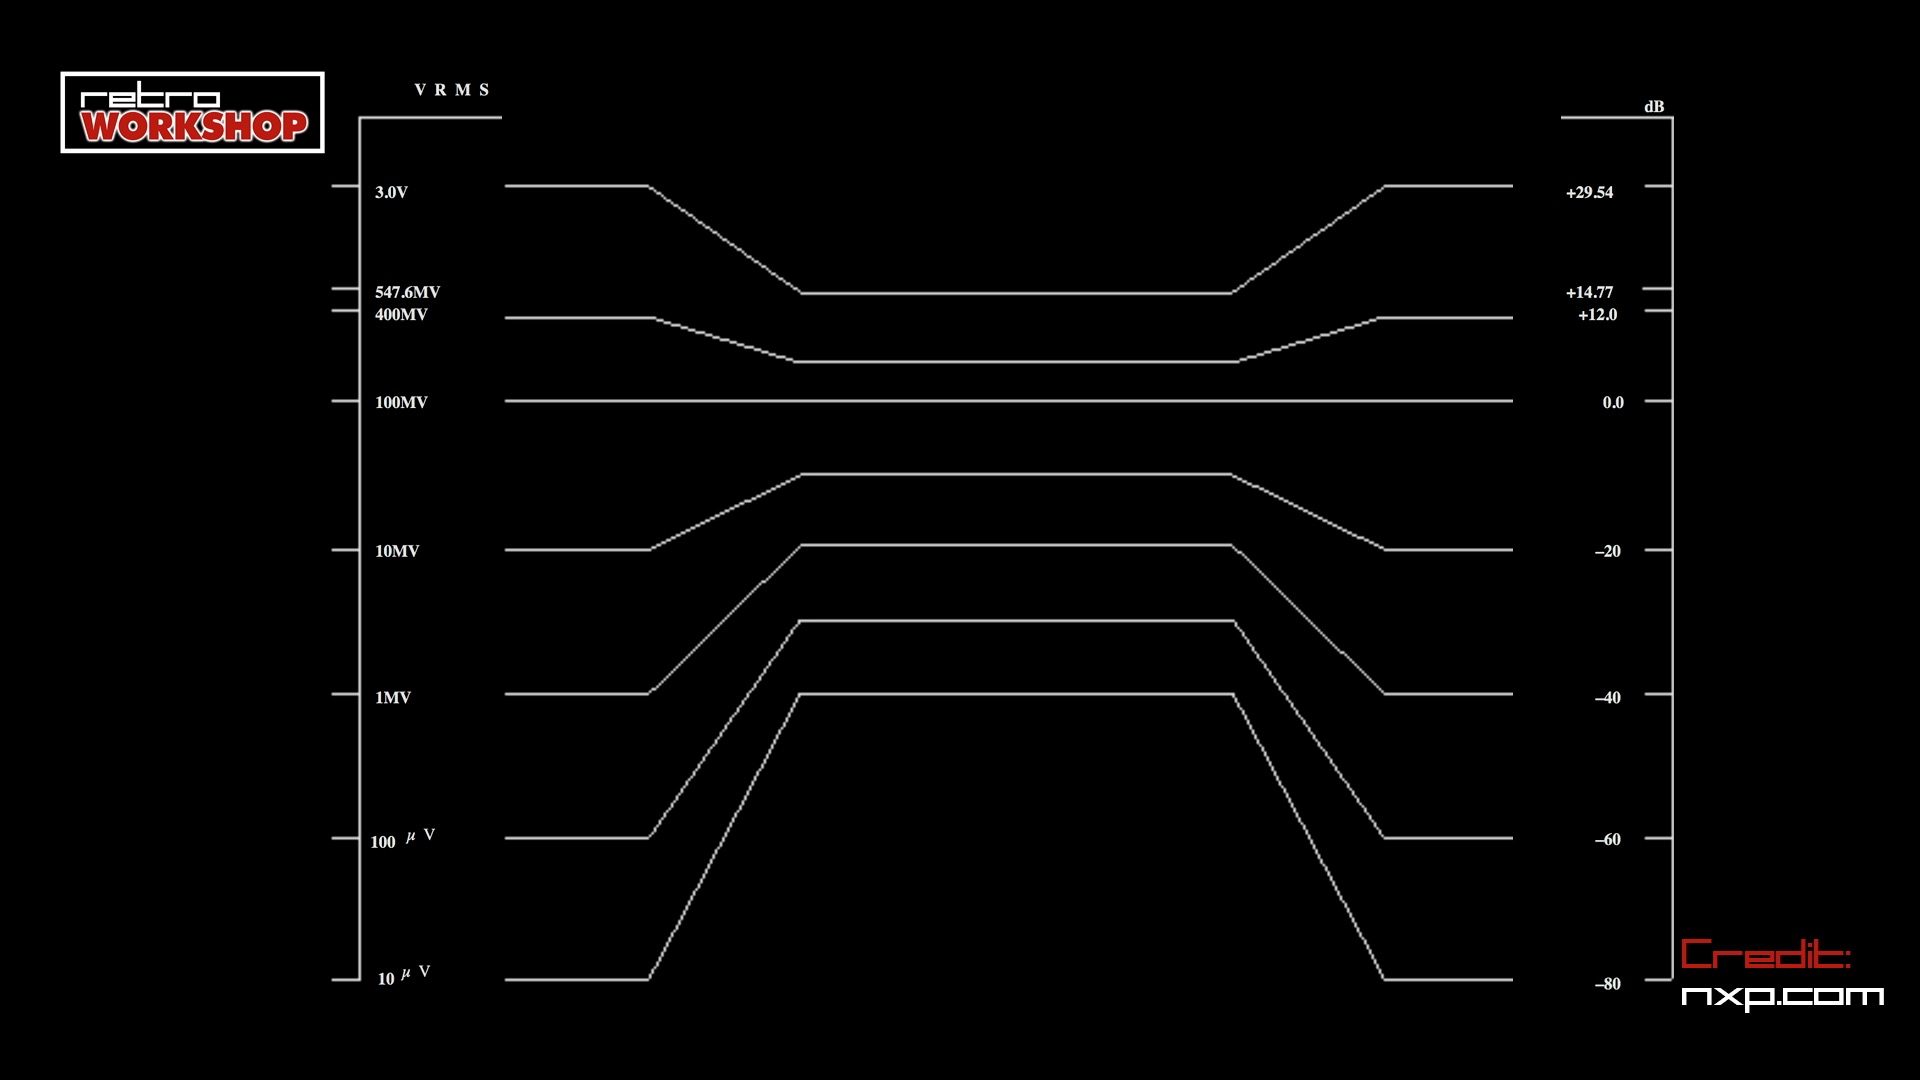
The word compander is a combination of the words compressor and expander.
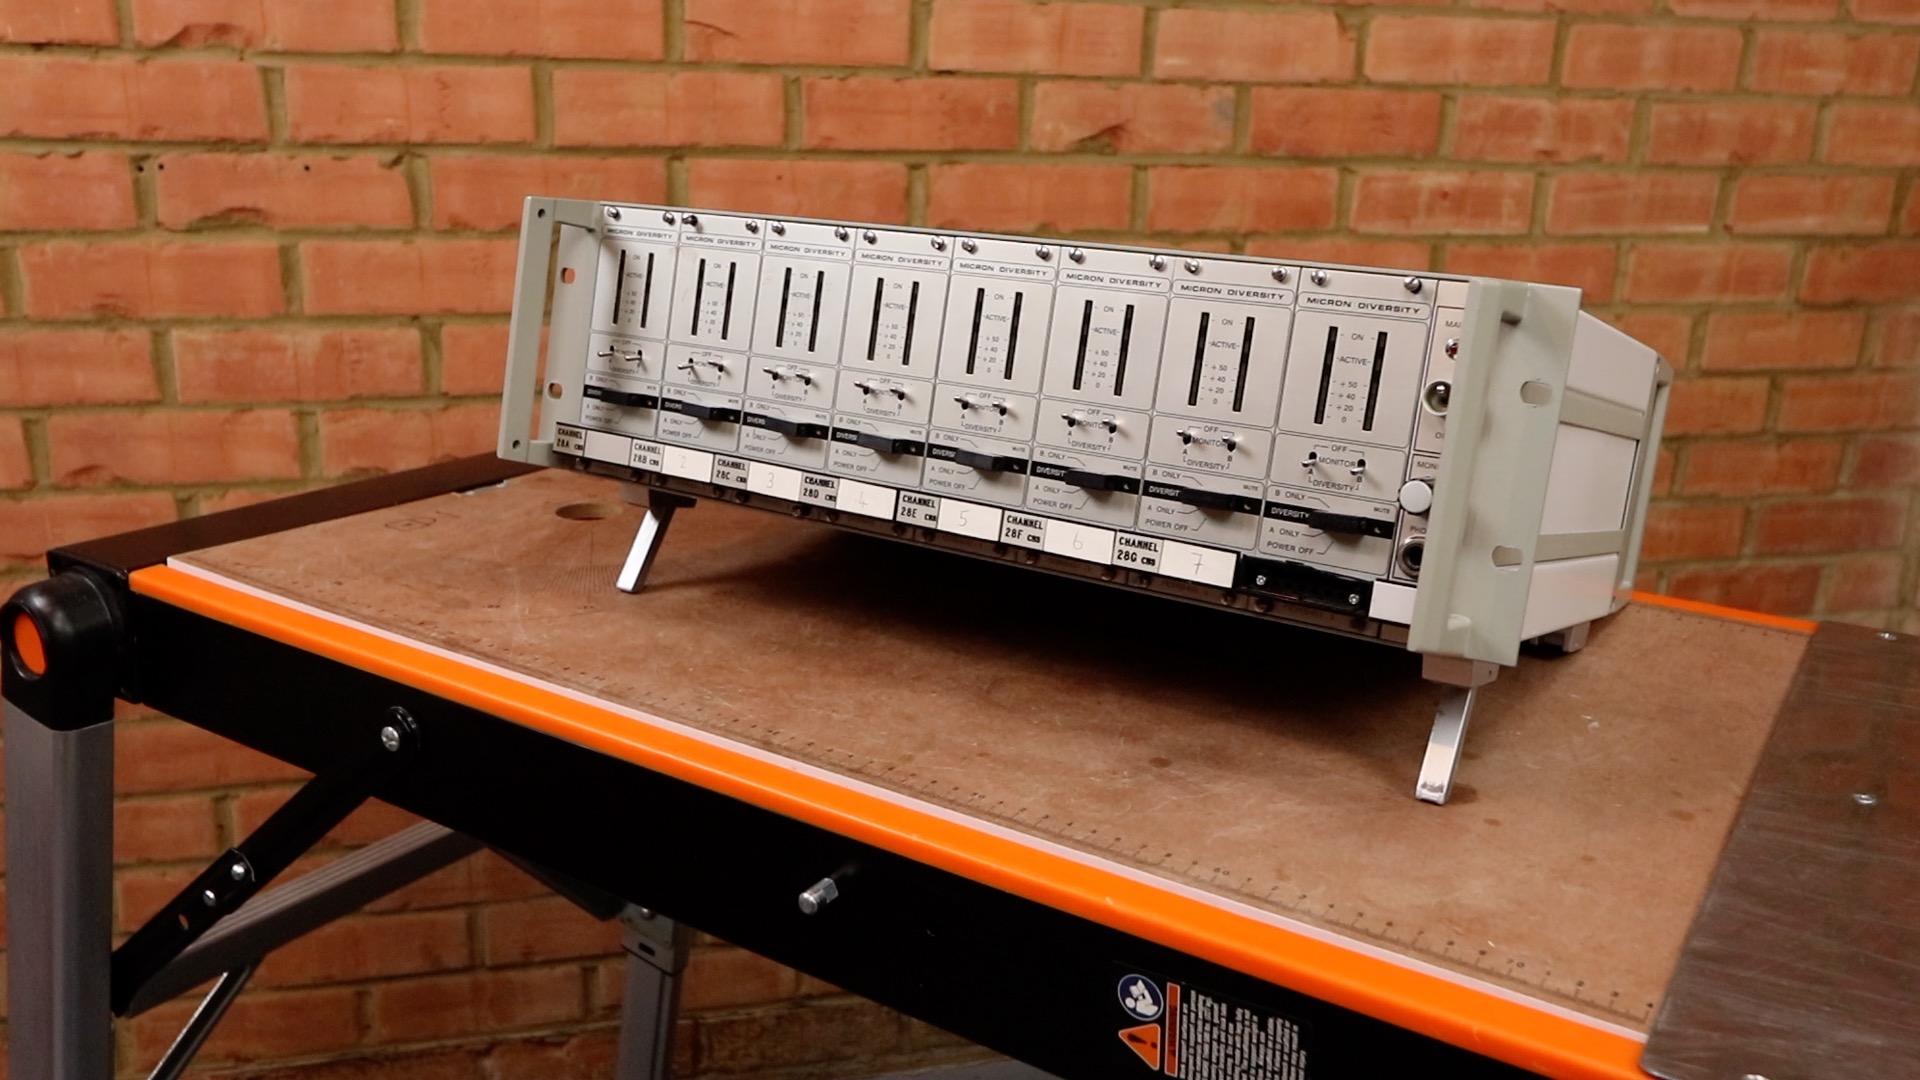
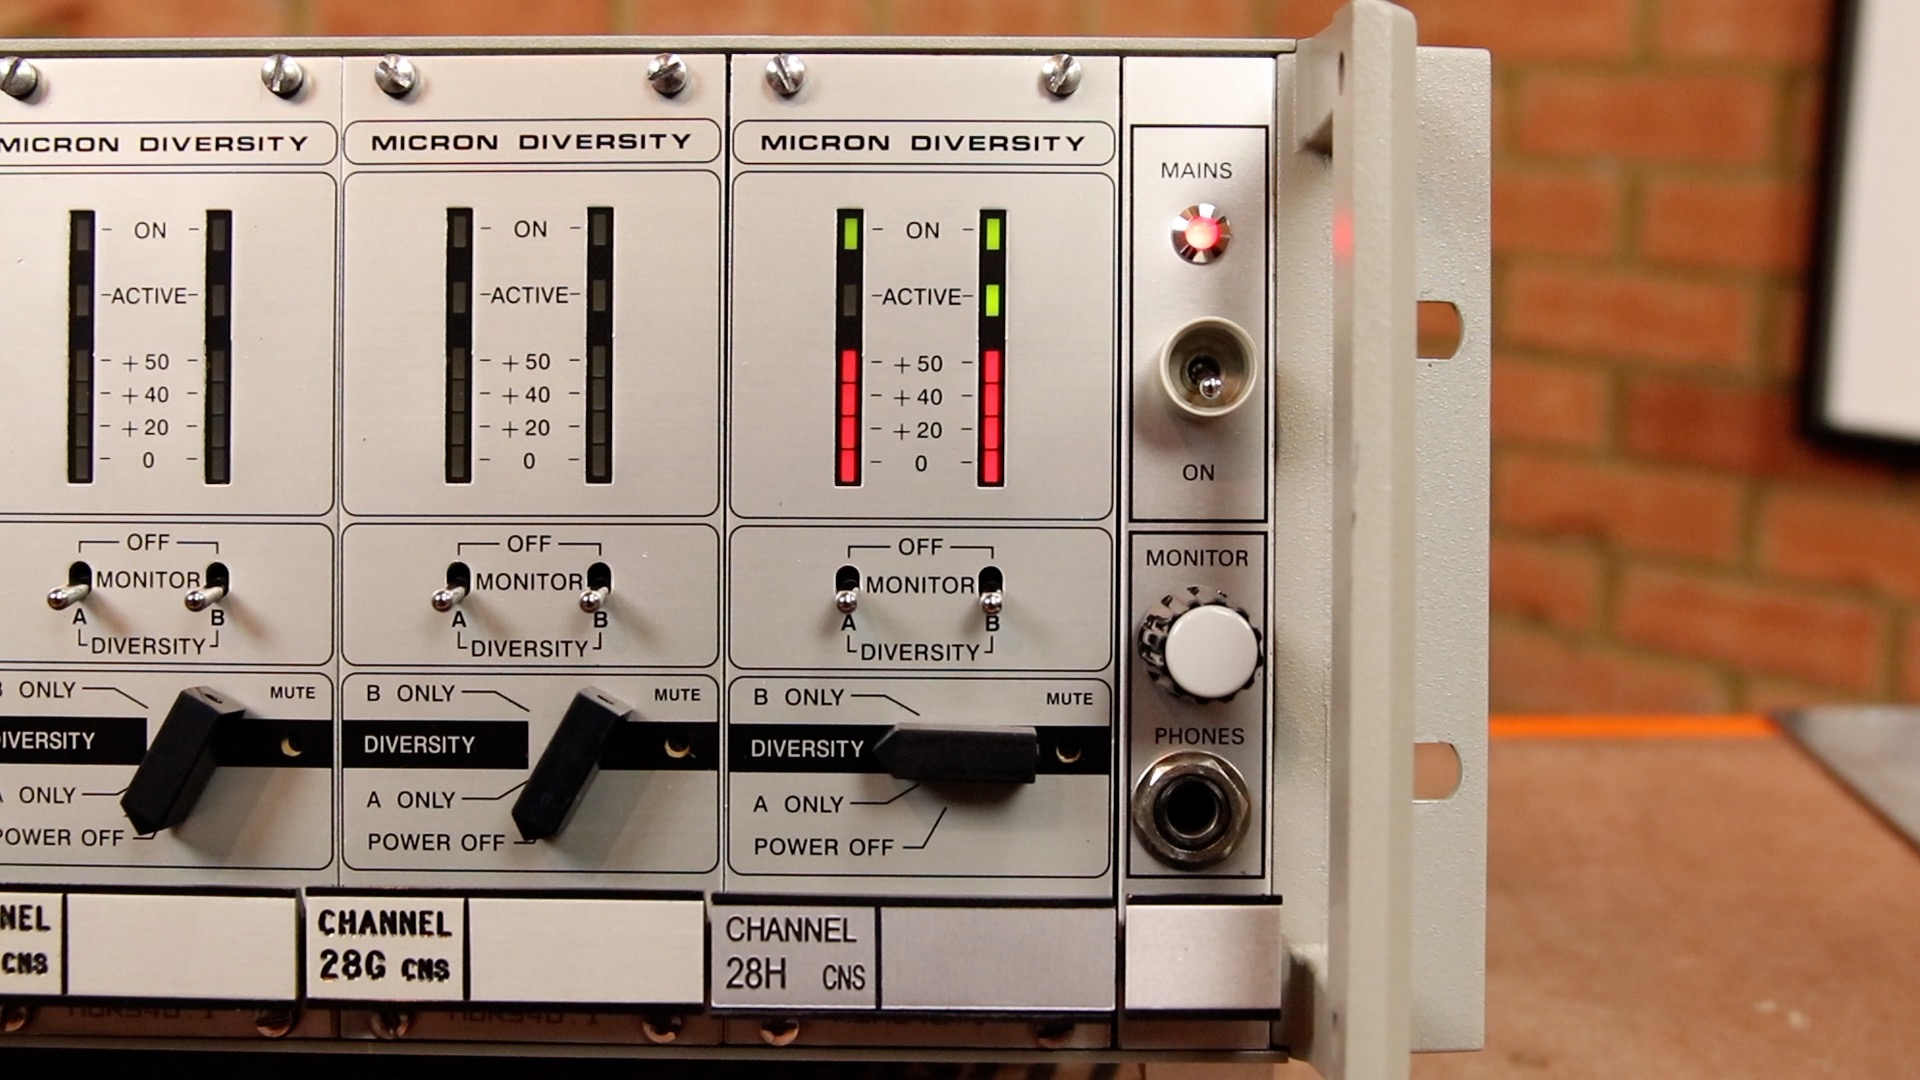
Operational Tour – Receiver Rack
The receiver rack contains at the rear:
- power supply module that can accept either 240V mains AC, or 12V DC
- 2 antenna distribution modules. Each accepts a single antenna and distributes this to each of the eight receiver modules.
- Audio output module. This has 8 XLR connectors with balanced line-level analogue audio from each receiver module. There is also a headphone connector which takes a feed on the monitoring output of each receiver.
At the front:
- power supply switch
- headphone monitoring jack with level control.
- 8 MDR540.1 receiver modules
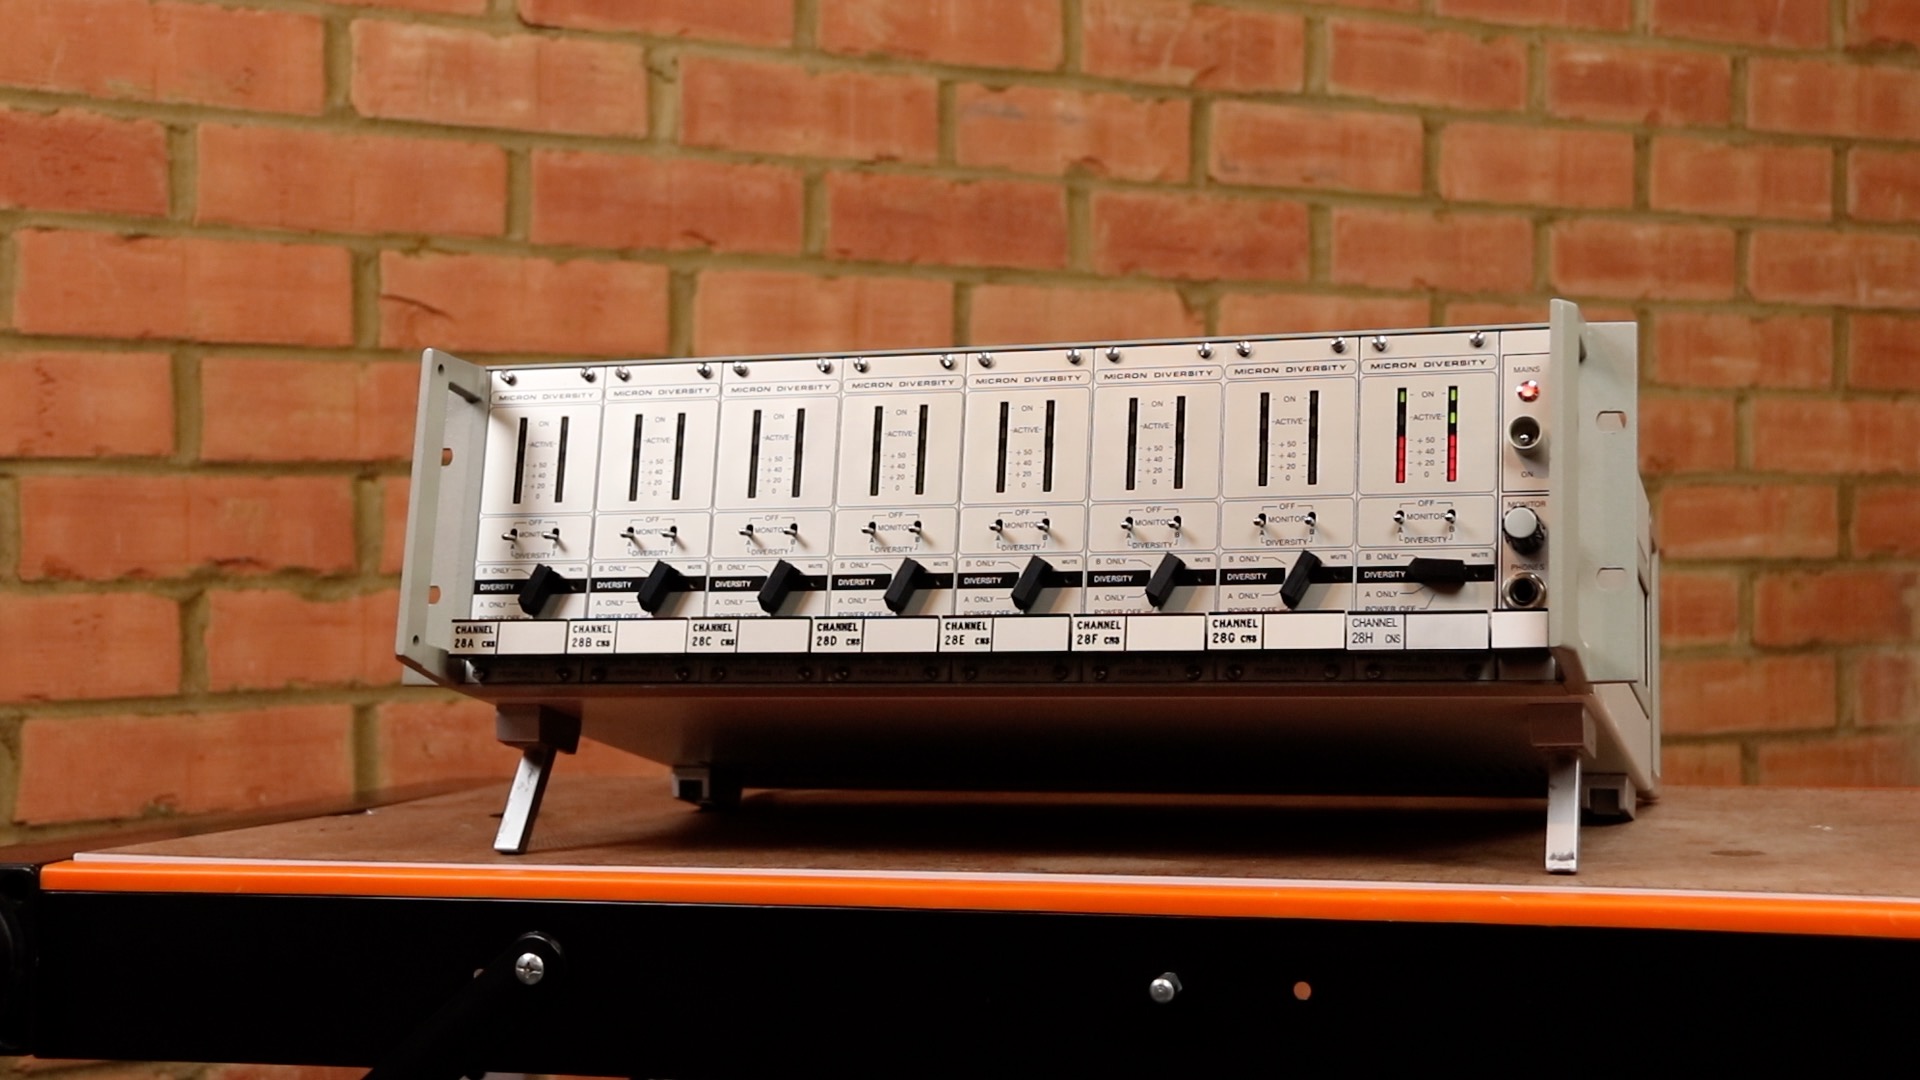
Each receiver is tuned to a single frequency and has a number of switches:
- Off / A / Diversity / B – this switch turns the unit on and selects whether you want to use the A receiver output, the Diversity output (see later) or the B receiver output.
- Monitor switches for A and B. You can route the A receiver to the local headphone monitoring jack, the B receiver, or the diversity output (both switches selected).
There is also a display with LED’s showing:
- received signal strength for A and B receivers
- Active antenna (A, B or both)
- a weak battery in the transmitter will cause the signal strength meter to pulsate in brightness
Diversity Reception
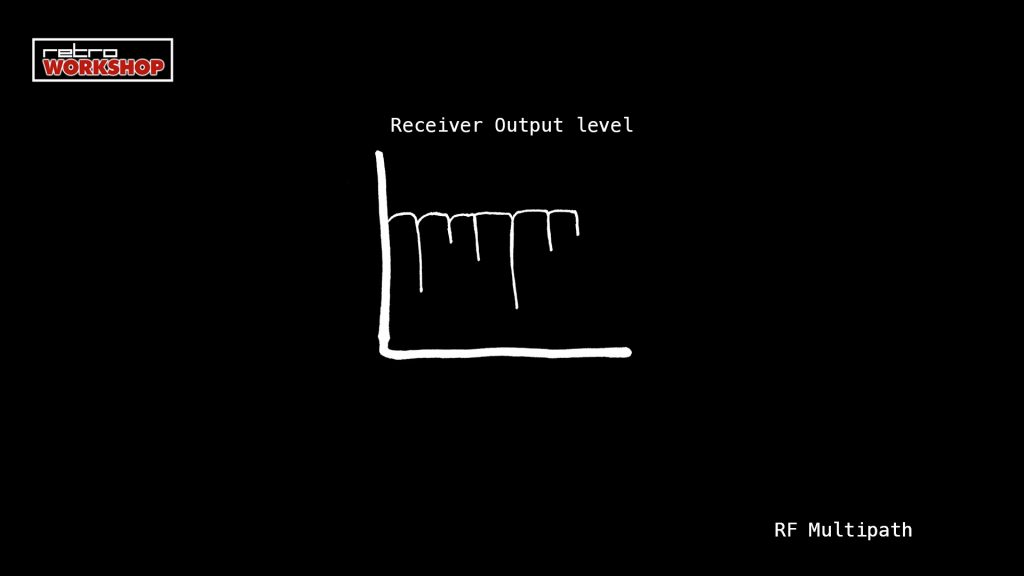
Let’s consider a radio mic in a studio with a wall, and a standard receiver with one antenna. The radio signal will travel from the mic to the receiver.
Now, the antenna actually transmits all around, so there are other paths for the signal to take, some bouncing off the wall, and taking a longer path.

These signals generated by multiple paths are added up a the receiver. Some cancel out, and this can give rise to signal “drop out“.
A diversity receiver has two antennas, spaced apart, each connected to a separate receiver. It is unlikely that both receivers will encounter drop out at the same time. If we switch between receivers we can therefore avoid loosing our audio signal. In fact, if both signals are good, we can add them up and this has the benefit of reducing noise.
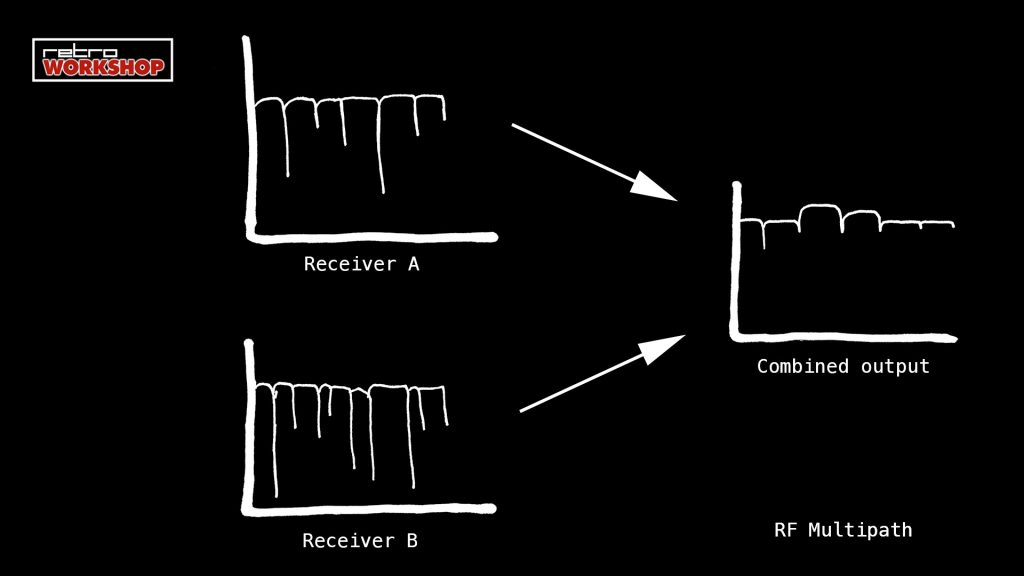
On the Micron diversity receiver we can select:
- The first receiver only – A
- The second receiver only – B
- Diversity mode which selects either A or B. If both are good, they will both be active and the signal will be combined
There are also switches to allow us to feed local headphone monitoring with either receiver, or the diversity output.
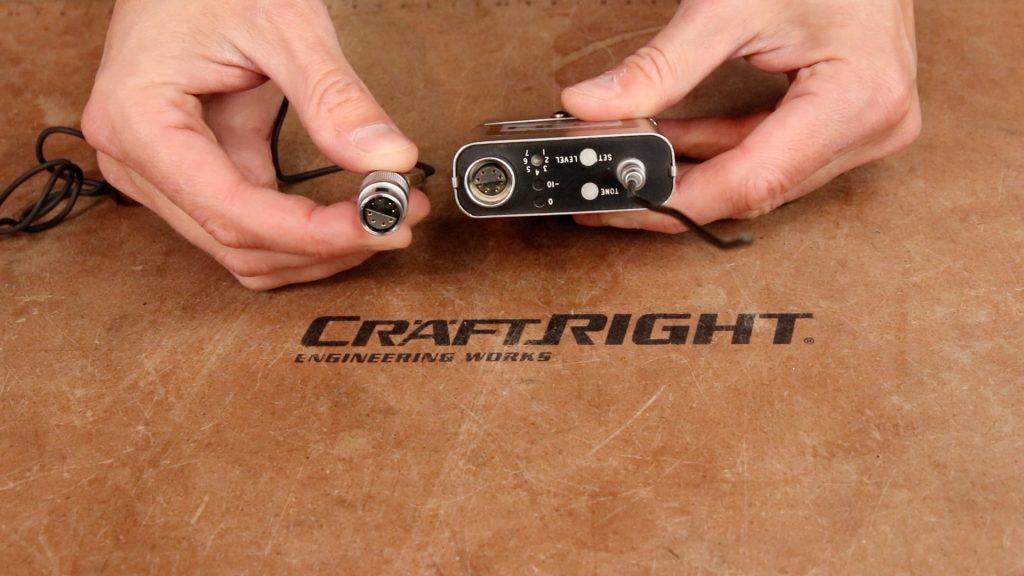
Operational Tour – TX501 Pocket Transmitter
Most of the receivers in my rack were intended to be used with a TX501 transmitter. This is a small steel box into which you can connect a microphone. The TX501 would then be placed in a jacket or trouser pocket. For ladies, the transmitter would be stowed in pouch on a special belt if they didn’t have a suitable pocket. We used this transmitter in studio 7 at BBC TV Centre where I worked for some time from the late 90’s and early 2000’s. This was, however a fairly standard piece of kit used by many broadcasters at this time.
The mic is likely to be a clip-on microphone, or “lavalier” as they are known. I dislike the word as I can’t pronounce it! They are also known as “lavs” which, to me, is a toilet, and I don’t think we should confuse the two.
Commonly this would be a Sony ECM77 which has been around for many years and is still favoured by BBC News. I have spent many an evening remaking the connector where the ECM77 cable connects to the transmitter, as they are easily snagged on clothing, door handles etc. I have to say I can’t remember ever having to send off a faulty TX501 for repair. They were very reliable. The connector is an interesting looking 8 pin Lemo. It contains both male and female connections so is known as a hermaphrodite connector. They have become rather hard to obtain – I bought two ready made cables from eBay for £40 and re-used the connector to fit my microphone.
Theatre folk prefer Sennheiser MKE2 mics (we also used these at BBC London local news for many years, and these were very reliable). The manual for the TX501 contains wiring instructions – some require a resistor or capacitor. And there are inputs for both high and low level signals, as well as any required polarisation voltage.
The TX501 is powered by a single 9 volt PP3 battery. There was a larger TX502 transmitter which could take 2x PP3’s for longer running times, but I have never seen one of these in the flesh. The unit is switched on by inserting the mic connector (2 pins are shorted in the plug).
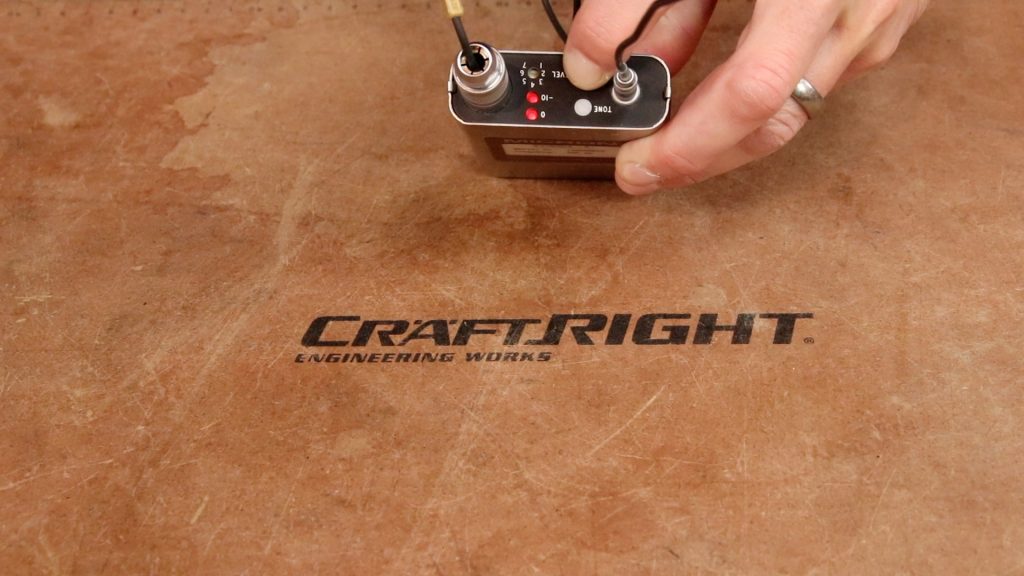
There is a Lemo coaxial connector for a straight, flexible antenna.
To set the mic level, you press an hold the Set Level button. This activates two LEDs which show when the following audio levels are exceeded:
- -10dB
- 0dB
You press the button and talk, then adjust the rotary control until you only occasionally see the 0dB LED illuminate.
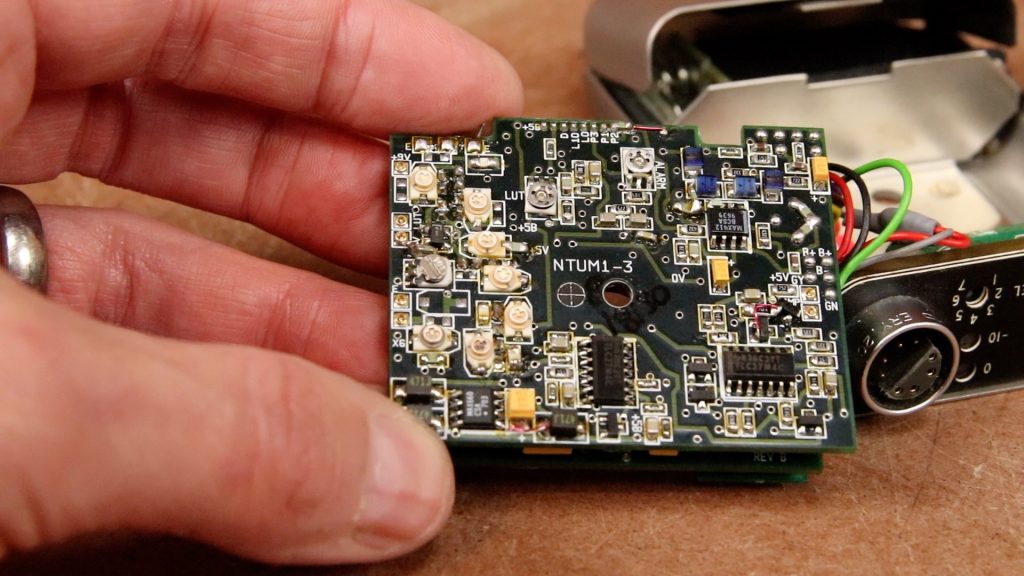
In the video I show the innards of a TX501 to illustrate the electronics. There are 3 boards, tightly sandwiched, with many discrete components and a few small surface mount IC’s. We can see the SA572D compander IC. I didn’t want to dismantle the TX503 as this would have required peeling off a label that covers a screw. These labels are the type that leave “Void” when removed.
Conclusion
I tested both mics and found them to be in perfect working order. I connected the receiver using the balanced line-level output via a Behrringer UMC204HD (USB interface) to my laptop. I recorded .WAV files which were then sync’d with the camera files for my video.
The audio quality is very good, but perhaps there is a little more noise than wired microphones. The companding effect is not noticeable, as it is with some cheaper mics (e.g. earlier Sony UWP series).
The equipment is well built and simple to use.
I did some research and discovered that my units were sold to Anglia TV in 1998. There was a rumour that they then spent time at the Theatre Royal, Norwich, but I couldn’t confirm this with the theatre. But they’ve found a good home now. They will mainly be used as display pieces, with a spot in my office reserved for the TX503 on its stand. I managed to find a genuine Micron mic holder – important as the mic is an unusual shape.
Whilst researching these devices I posted a picture of the equipment on a Facebook forum frequented by TV professionals. The post generated many comments, with fond memories of TV shows and studios now long gone that used Micron equipment: Noels House Party, Fifteen to One, The Big Breakfast and Get Fresh. The equipment was held in high regard and was thought to be well built and reliable. And I have to agree.
The Facebook comment about The Big Breakfast reminded me I once appeared on the show to ask a question in an inspired item called “Around The House in 8 Daves“. The item featured the stars of a Channel 4 show called “Around the World in 80 Raves” and the interview was to be conducted by 8 people called Dave, each situated in a different location around the house (the show was filmed in a house in east London). Digging out the old VHS tape, sure enough I was asking my question into a TX503 microphone. This clip can be seen at the start of my video.
Postscript
Just after my video was completed, a statue was unveiled in Bury, Lancashire of the late comedienne, Victoria Wood. Cast in bronze with a Micron handheld.

Used with permission
Hello!
After seeing your you tube video which features Micron radio microphones, I wondered whether you might be able to help me.
I use Micron radio mics all the time and I’ve been wanting a radio stick for some time. I was lucky enough to get a TX203 (VHF) on a frequency I have a receiver and licence for, but there’s something wrong with it – it sounds like the compander I think.
I have bought a TX503 hoping it was the capsule but it isn’t.
I’m wondering whether you could combine the electronics so that I can have the benefit of the 503 (which is supposed to be working properly but I don’t have a receiver for it) but substitute the rf end with the 203 transmitter’s board.
Best regards, Alan
Hi Alan. I have been trying to get a combination of TX stick mic, and a small portable receiver together. So far I have been unsuccessful. I now have 5 mics, and various receivers, but no frequency match, and none of them known to be in a working condition. I have emailed you full details for info. Best wishes – Dave.
Hi Alan. A curiosity. The Micron tx503 microphone was used by the presenter of children’s TV programs in Brazil called Xuxa Meneghel. The Micron tx503 microphone became known in Brazil, Argentina and the United States as the Xuxa Microphone. The design of the Micron tx503 became a children’s toy. You can see it on the website: https://observatoriodatv.uol.com.br/noticias/ha-30-anos-estreva-o-xou-da-xuxa-na-globo-apresentadora-celebra-na-rede-social e the toy at: https://www.xuperblog.com/2008/05/tnel-do-tempo-microfone-da-xuxa.html
Very interesting. Famous in Brazil and a toy. I will check it out thanks for posting.
Brilliant little report. I’ve managed to get my hands on a few bits and one of the mini rack receivers which has just 2 of those receiver modules plus 2 handhelds and a few of the TX units which take 2xPP3 batteries, one in need of some fixing.
Let me know if any of these bits are something you want pics of.
Hi Tony. I’d be interested to see photos of your Micron kit. I’ll send an email across…
I worked for Audio Engineering from 1969 – 1982 on the engineering side. Made parts and assembled the Micron range of radio mics. I have a few hand held mics as my legacy of working for the best audio company at that time.